
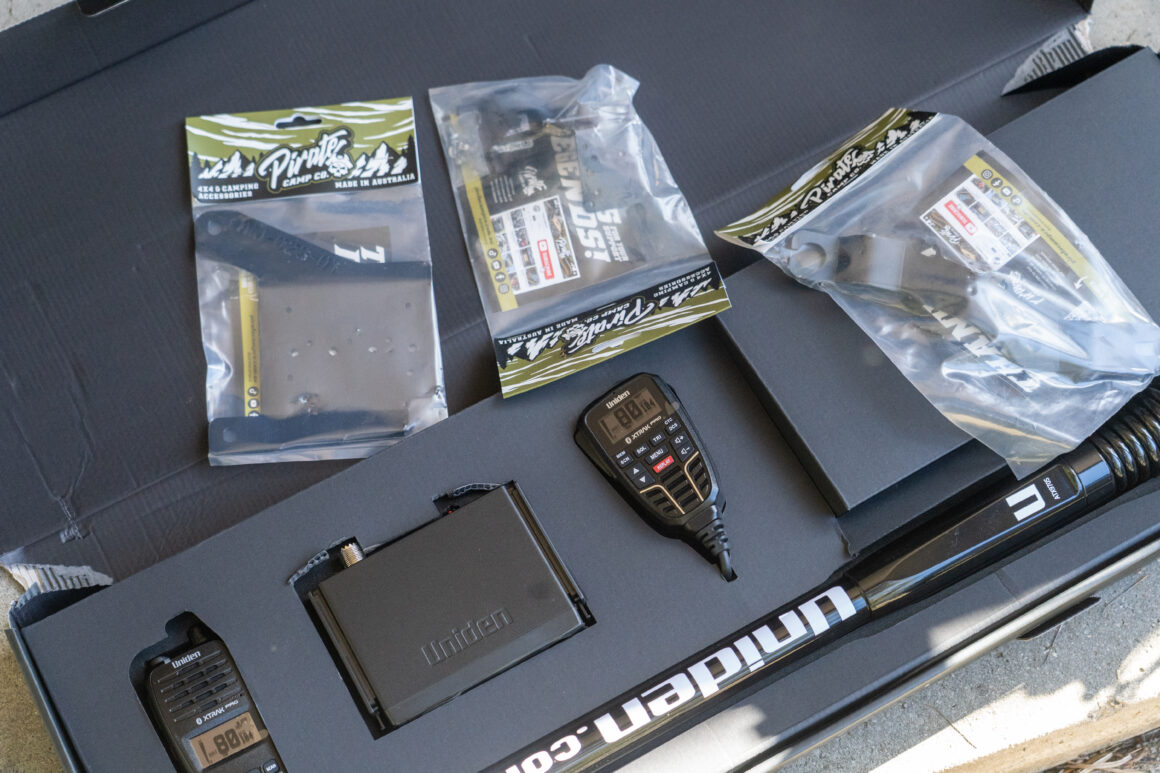
Fitting out our Ford Ranger ahead of filming the next season meant ticking off a long list of practical upgrades, and high on that list was a tidy, functional UHF install. We opted for the Uniden XTRAK 80, and to make the job easier (and neater), we turned to a trio of mounting solutions from Pirate Camp Co: the Aerial Mount, Module Mount, and Handpiece Mount.
This Aussie brand has been quietly building a reputation for no-fuss mounting solutions tailored to the Next-Gen Ranger/Everest platform. We figured they’d help speed up the install, make it more professional, and save us from a centre console full of rattling cables and sticky tape jobs. Here’s how it all went together.
1. Aerial Mount – Bonnet Hinge Bracket
$70.00 | AUSTRALIAN MADE | STAINLESS STEEL | 24 MONTH WARRANTY
First cab off the rank was the Aerial Mount, and straight up, this thing is brilliant in its simplicity. Designed to bolt into the passenger side bonnet hinge, the bracket puts your aerial right in the sweet spot between the windscreen and bonnet, where it clears everything without looking awkward.
Install was done in under a minute, though a second set of hands helps. The factory paint marks on the hinge work as a guide so you can line things back up when you cinch the bonnet down again. Easy stuff.
There’s no interference with wipers or windscreen, and the bracket orientation means even when the bonnet’s fully up, the aerial won’t be contacting anything. Like all bonnet-mounted aerials, there’s a bit of movement in the whip, but it’s less distracting than bullbar-mounted ones because it’s further out of the driver’s line of sight.
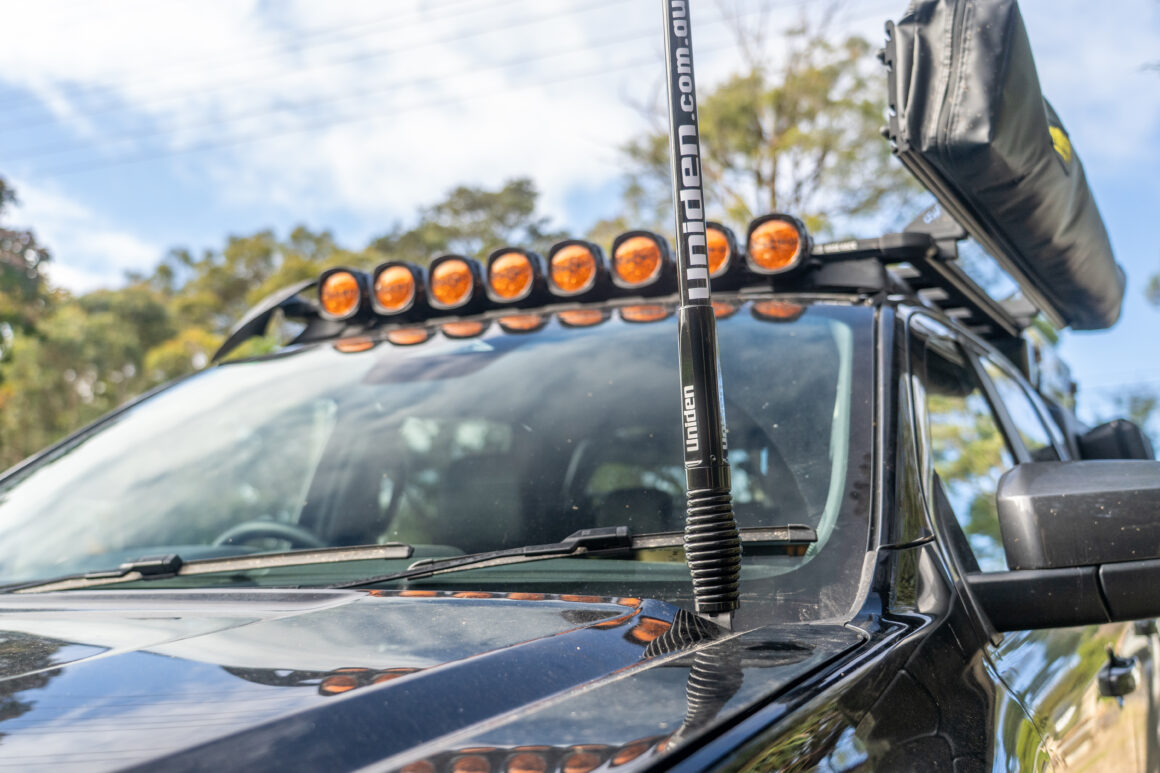
If you’re running something like an ARB Zenith bar (like we are) with no aerial tabs, this bracket is a lifesaver. Powdercoated black, stainless construction, it’s solid, smart, and Aussie-made.
2. Module Mount – Large UHF Mount
$59.00 | AUSTRALIAN MADE | CUSTOM FIT | 24 MONTH WARRANTY
Next up was the business end of the comms — the UHF module itself. Pirate Camp Co have two module mounts for the Ranger depending on what UHF you’re running, and for the larger Uniden XTRAK 80, we went with the large module bracket, which tucks up above the brake pedal in the driver’s side footwell.
It’s a neat bit of folded steel designed to reuse factory bolt holes, so no drilling required. The XTRAK’s bracket holes didn’t perfectly line up with all four mount holes, but we managed to make it work with a little persuasion. That said, a few more universal mounting slots wouldn’t go astray. Especially for those not keen to drill into their brand-new bracket.
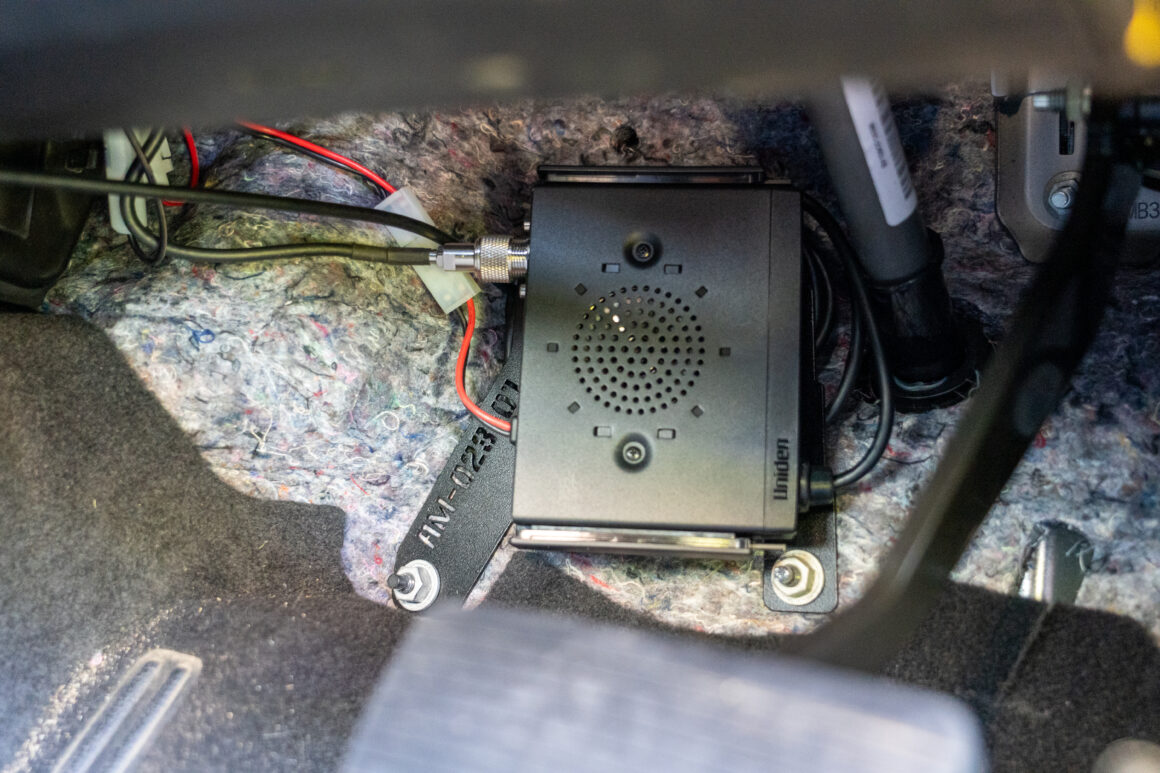
With the larger bracket living on the driver’s side Vs the smaller offering on the passenger side wiring back and forth through the dash was a bit fiddly, that’s more a comment on the space available for UHFs than a reflection on the Pirate design. It does mean if you’re running your mic to the driver’s side, this location does help.
Now, a quick word on instructions: There aren’t any. Just a QR code to a tongue-in-cheek video of a bloke pulling his dash apart while cracking jokes. It’s funny, but not exactly detailed. If you’re confident with tools, you’ll be fine, but if you’re a first-timer, a proper diagram would make life a bit easier.
Still, at $59, it’s a huge step up from Velcro, cable ties, or custom brackets, and the end result is rock solid.
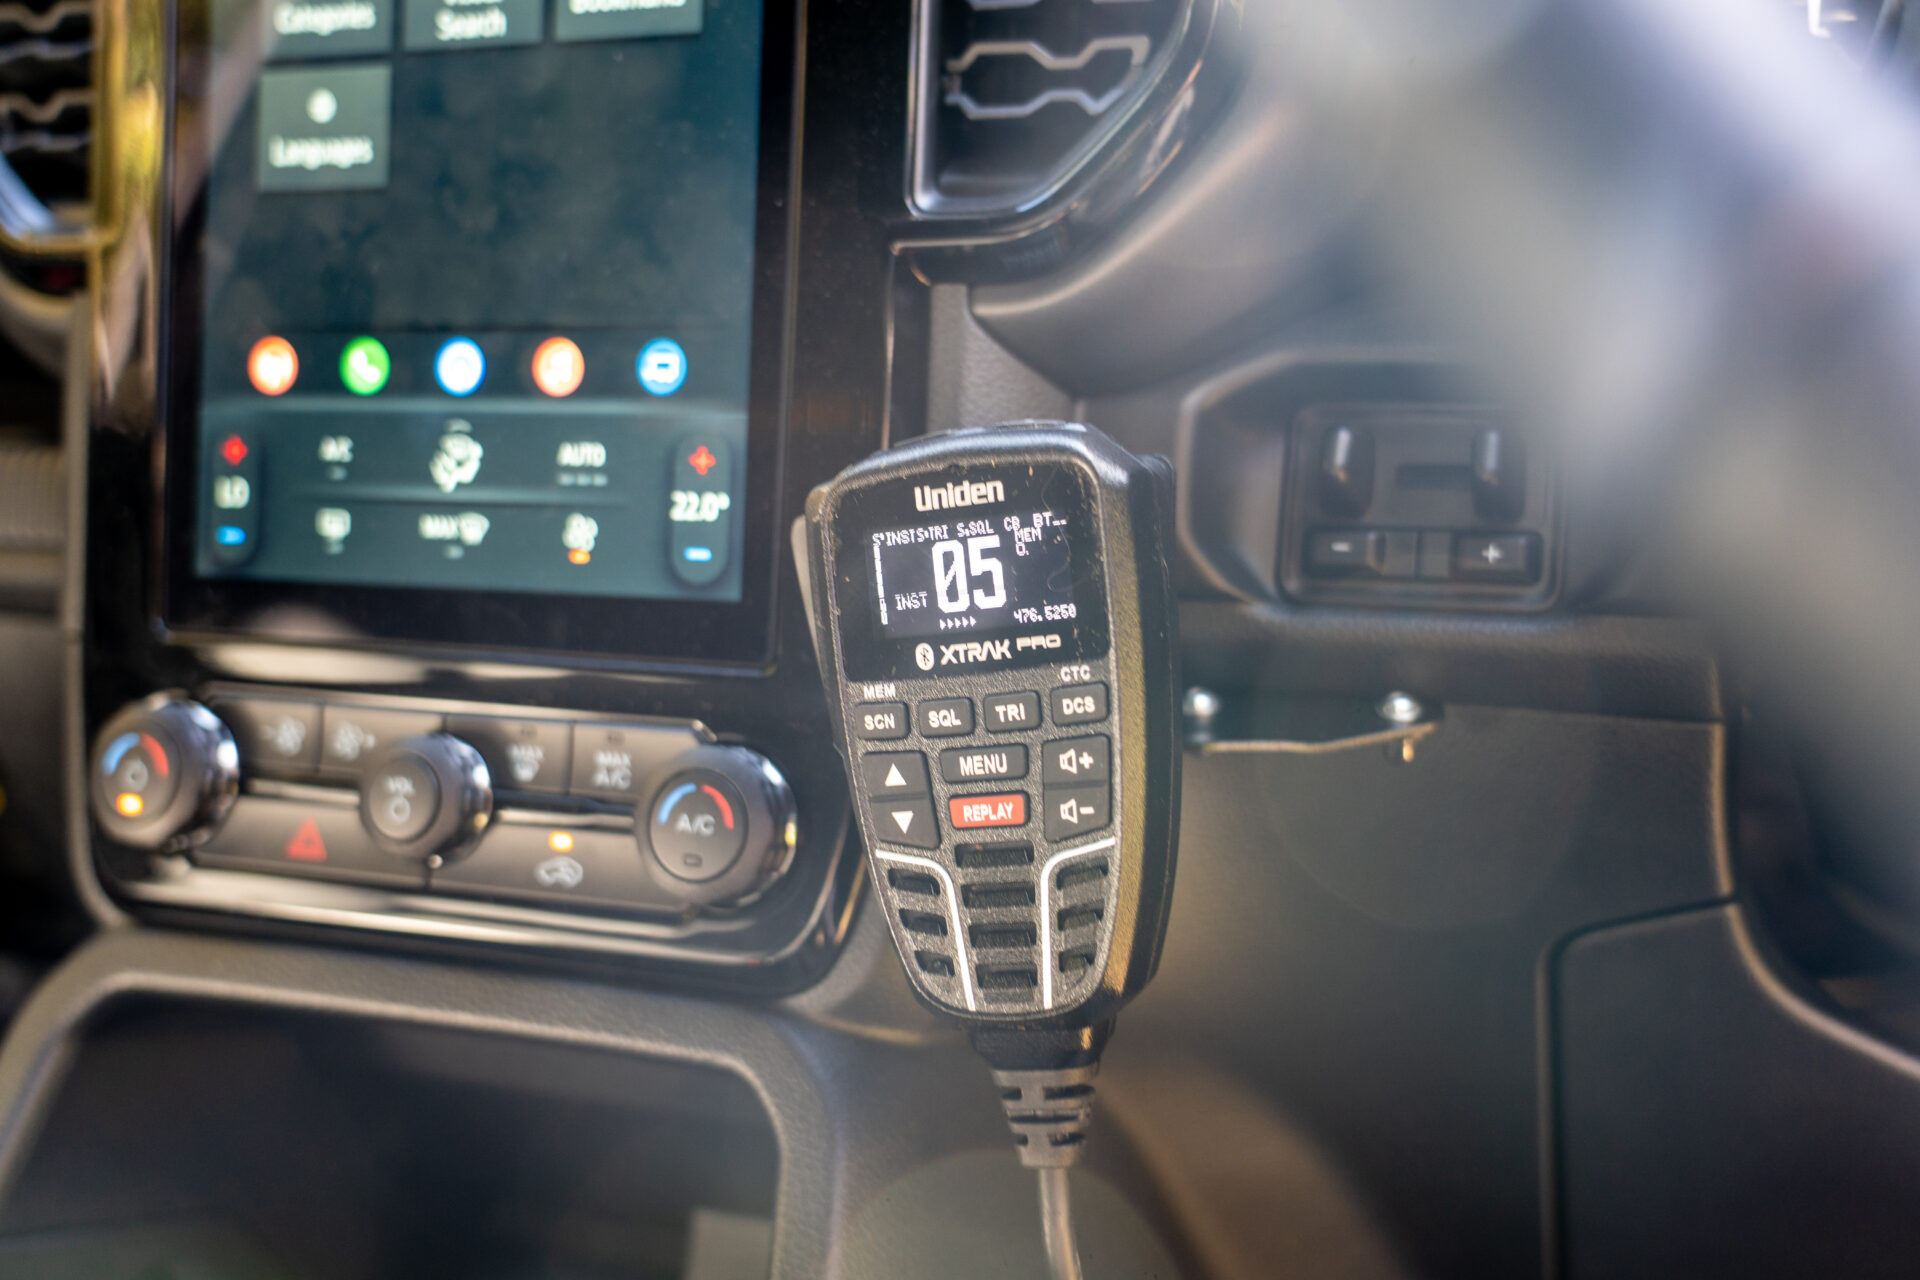
3. Handpiece Mount – For Modern Mic Units
$59.00 | TWO-PIECE BRACKET | MAGNET OR CLIP COMPATIBLE | 24 MONTH WARRANTY
The last piece of the puzzle is the Handpiece Mount, and honestly, it’s probably the most important bit for everyday usability. With modern UHFs like the XTRAK 80, the handpiece is also the screen, so placement is everything. Visible, accessible, but out of the way so it’s not slapping your knees every time you take a corner.
Thankfully, Pirate have nailed the design. It’s a two-piece bracket so you can fit the base with the dash panel off, then clip the dash back on and add the top section later. Smart, tidy, and looks completely OEM once it’s all in.
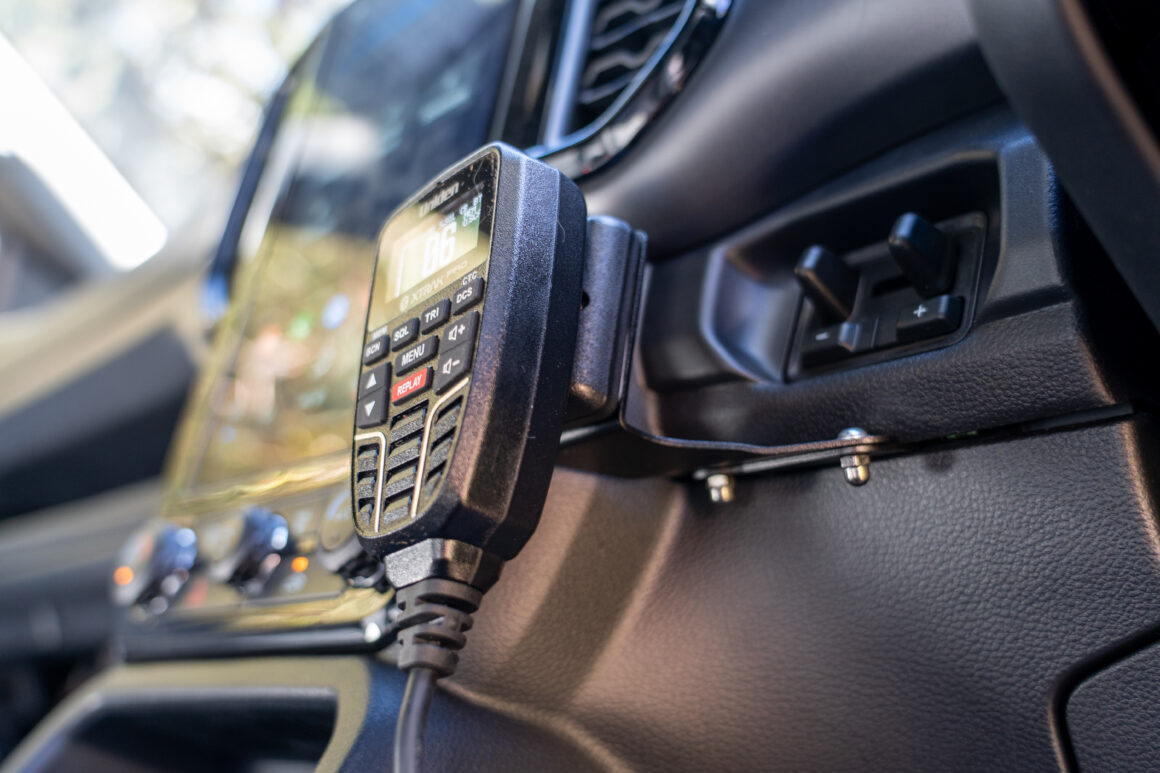
We used the magnetic backing and the double sided tape on the XTRAK to hold it in place, didn’t even need bolts. It’s secure, out of the way, and doesn’t look like an afterthought. Like the other bits, the finish is clean and the bracket feels tough enough to last forever.
But again… the instructions? More entertainment than education. We love a laugh, but sometimes when you’re elbow-deep in trim panels, you just want a diagram. You won’t get lost, but you might get frustrated.
Final Thoughts
Pirate Camp Co aren’t just making brackets they’re making UHF installs easier, quicker, and better looking. Between the three products, we saved at least a couple of hours stuffing around with placement, less-than-ideal installs, and fiddly DIY brackets. For around $190 all up, it’s a small price to pay for what looks and feels like a professional auto-elec install.
Yes, we’d love to see some better instructions, and maybe a few more mounting holes for broader compatibility. But functionally? These bits of kit are rock solid, smartly designed, and clearly made by people who know the Ranger platform inside and out.
If time is money, Pirate Camp Co’s gear just paid for itself. And now we’ve got a UHF setup we won’t need to touch again no matter how many corrugations the crew point these rigs at